
Values can be typed into the registers in the way well known from older AVR microcontrollers, for e.g.
REGISTER_NAME = (1<<BIT1) | (1<<BIT2);Although having a few hundred of registers in hand, you will find this manner inconvenient. Atmel engineers came up with an idea, to configure registers using structures, making the code look slightly different:
PERIPHERAL_NAME.REGISTER_NAME = ...;As I have written in the previous article XMEGA microcontroller peripheral systems are multiplied, and differ from each other by their memory register addresses and the peripheral’s name (PORTA, PORTB, PORTC...). Apart from that everything is identical. So you can type any value into the port registers for e.g.
    PORTA.DIR = ...;
    PORTB.DIR = ...;
    PORTC.DIR = ...;
    PORTA.OUT = ...;
    PORTB.OUT = ...;
    PORTC.OUT = ...;
Writing program’s code using structures gives us a very important advantage – once the code has been written for a specific peripheral it may be used with all of its copies. Having 8 USART interfaces in case of dealing with an old AVR’s we would have to copy USART functions 8 times changing the names of their registers. When it comes to XMEGA it is sufficient to write the function only once, and as the argument – to specify which peripheral system we are interested in.
Let’s take a look at the example showing us how we can manage different ports using only one function:
    void SetPort(PORT_t *portname) {
        portname->DIR = ...;
        portname->OUT = ...;
    }
As an argument function receives port name. It can be used in a following way:
    SetPort(&PORTA);
    SetPort(&PORTB);
    SetPort(&PORTC);
By applying a function operating on structures the program size can be considerably reduced. However in case of ports this method may seem pointless, I can assure you that when it comes to more complicated peripherals this manner speeds up the whole programming process.
Although hexadecimal and binary values may be typed into the registers, it is asking for trouble and a waste of time. Such methods should be avoided!
It is acceptable to use a method known from old AVR’s. It uses bit relocation operator and predefined symbols with the _bp suffix, which stands for bit position defining bit’s number in the register.
PORTA.DIR = (1<<PIN1_bp) | (1<<PIN0_bp);A new method is available, using predefined symbols with the _bm suffix, which stands for bit mask. Thanks to elimination of brackets the notation becomes more legible.
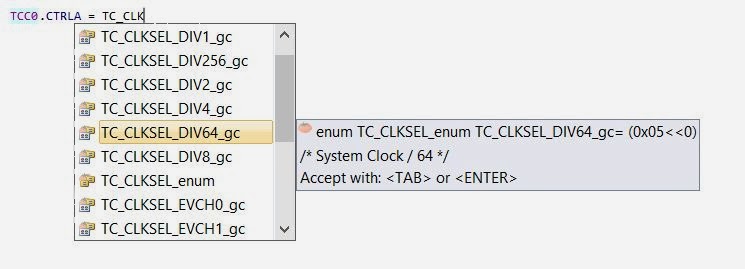
PORTA.DIR = PIN1_bm | PIN0_bmMore complicated peripherals may have a few bits responsible for some process execution. A good example is the timer clocking source, chosen using 4-bits. In this particular case we use symbols with the _gc suffix (group configuration). To illustrate this example, let’s have a look at the figure below. It shows possible settings of source clocking and timers prescaler.

In order to set timers prescaler TCC0 to 64, first we need to type into the CTRLA register an appropriate configuration group CLKSEL. The example explains everything:
TCC0.CTRLA = TC_CLKSEL_DIV64_gc;Atmel Studio has a very useful function of predicting, what exactly the programmer is about to type in. The application program prompts him with possible options.
If there were more bits to configure in CTRLA register, we can separate particular symbols _gc, _bm with an operator |. For code readability enhancement instructions can be divided into separate lines with additional comment.
    PERIPHERAL.REGISTER = CONFIG1_gc |   // comment
                          CONFIG2_gc |   // comment
                          CONFIG3_bm |   // comment
                          CONFIG4_bm ;   // comment
Nothing stands on our way to let predefined symbols become functions arguments. For e.g. one can write a function that configures some peripheral system, and then prompt it as follows:
    TimerInit(&TCCO, TC_CLKSEL_DIV64_gc, inne argumenty...);
    TimerInit(&TCC1, TC_CLKSEL_DIV2_gc,  inne argumenty...);
    TimerInit(&TCD0, TC_CLKSEL_EVCH0_gc, inne argumenty...);
    TimerInit(&TCD1, TC_CLKSEL_OFF_gc,   inne argumenty...);
In this way using only one function - TimerInit - we have managed to configure four timers named: TCC0, TCC1, TCD0, TCD1. More examples and descriptions can be found in training resources available on Atmel company website: Getting Started Writing C-code for XMEGA.


1 comments :
Thank U so Much Bro... Much Appreciated for Sharing this info.
Post a Comment
Post a comment